
That was 1.8Meg on the disk for a single 900x900 pixel .PNG file that would be a 6x6 tile square in MapTool.
Photoshop doesn't give me any options as far as compression goes for .PNGs. The only options while saving are Interlaced or not.
Vry's Perpetual Dungeon (Test 1)
Moderators: dorpond, trevor, Azhrei, Gamerdude

I thought my version od PS did. Maybe not. Can't check right now. I know GIMP does.Vry wrote:That was 1.8Meg on the disk for a single 900x900 pixel .PNG file that would be a 6x6 tile square in MapTool.
Photoshop doesn't give me any options as far as compression goes for .PNGs. The only options while saving are Interlaced or not.

Update:
Uploaded some new test pieces to the gallery here.
http://gallery.rptools.net/v/vry/Tokens ... eonPieces/
There’s actually two types of pieces being tested in this group, the larger full rooms and halls and the smaller do-it-yourself types.
Getting Started:
First, start off by making a new unbounded map with Blank.jpg.
Then adjust the grid size to 75.
//Adjusting the grid size isn’t really important unless you’re going to be using pieces larger than 6x6 tiles.
Now you can start dropping in tiles. It’s helpful if you bring in the tiles you want on the bottom first so you won’t have to do as much rearranging later. Tiles that should always be on the bottom are the rooms and hallways on the larger set and the floor tiles on the do-it-yourself set.
Connectors:
On the larger pieces, it is necessary to use connector pieces to attach hallways or rooms or rooms to other rooms. Four connectors are provided with this test set.
ConnectorC.png and ConnectorE.png are used when an intersection is made at a corner or other edge of a wall. Line up the straight side so that the wall continues flush.
Connector.png and ConnectorD.png are used when an intersection is made at least one tile away from a corner.
Generally, Wall-to-Room connections will use Connector.png and ConnectorC.png while Room-to-Room connections will use ConnectorD.png and ConnectorE.png.
Connecting hallways to each other and using endcaps to end a hall don’t need connectors as the pieces already tile. If two hallways are to intersect perpendicularly, Connector.png will usually be needed.
Do-It-Yourself Tiles:
These smaller pieces are cut up so that you can build your own rooms and halls of almost any shape. These are still very much a work-in-progress.
To build a dungeon with these tiles, start by laying out the floor area the way you want it, then use the wallbits and wallcorners to enclose the area.
Other Notes:
Sizing the tiles initially can be somewhat tricky. I may need to append an M,L,H,G, or C to the end of each filename to show what size it’s supposed to be. Currently, the naming system, such as it is, goes by the number of floortiles and doesn’t take the walls into account.
There are still a lot of things that haven’t been converted over from the old 40 version. If there’s something specific room or piece type you’d like to see, just ask.
-
heruca

- Dragon
- Posts: 400
- Joined: Mon Apr 24, 2006 1:11 am
- Location: Buenos Aires, Argentina
- Contact:
I was going to try them out using BRPG's new Tile feature.
Vry, if they work out, would you mind if I resized these for BRPG and offered them as a free zip on my site? Or perhaps even include them in the BRPG demo? Due credit would be given to you, of course.
Btw, the Wall Light is a neat piece of your set. You should add a corner light, too.
Vry, if they work out, would you mind if I resized these for BRPG and offered them as a free zip on my site? Or perhaps even include them in the BRPG demo? Due credit would be given to you, of course.
Btw, the Wall Light is a neat piece of your set. You should add a corner light, too.
-
heruca
- Dragon
- Posts: 400
- Joined: Mon Apr 24, 2006 1:11 am
- Location: Buenos Aires, Argentina
- Contact:
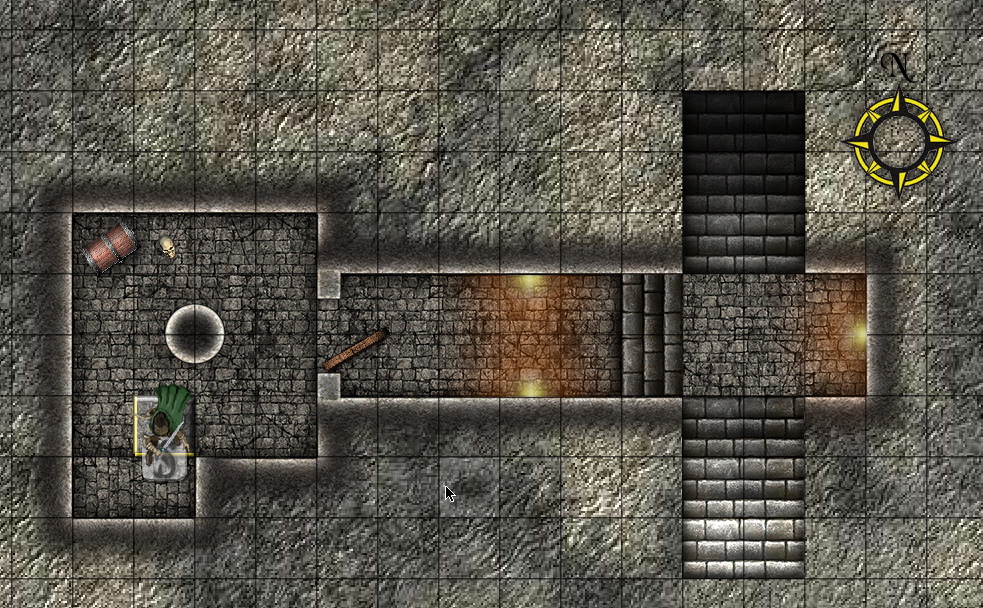
Here's how they look in BRPG, on the GM's view.
I used a stone texture as the base "map", then placed your dungeon pieces and told BRPG to treat them as tiles, so that they draw under the grid overlay and are unselectable/unmoveable by clicking on the map window.
Note the semi-transparent secret door symbol and secret room. These would not show up at all in the player's view, since they're set to Hidden.

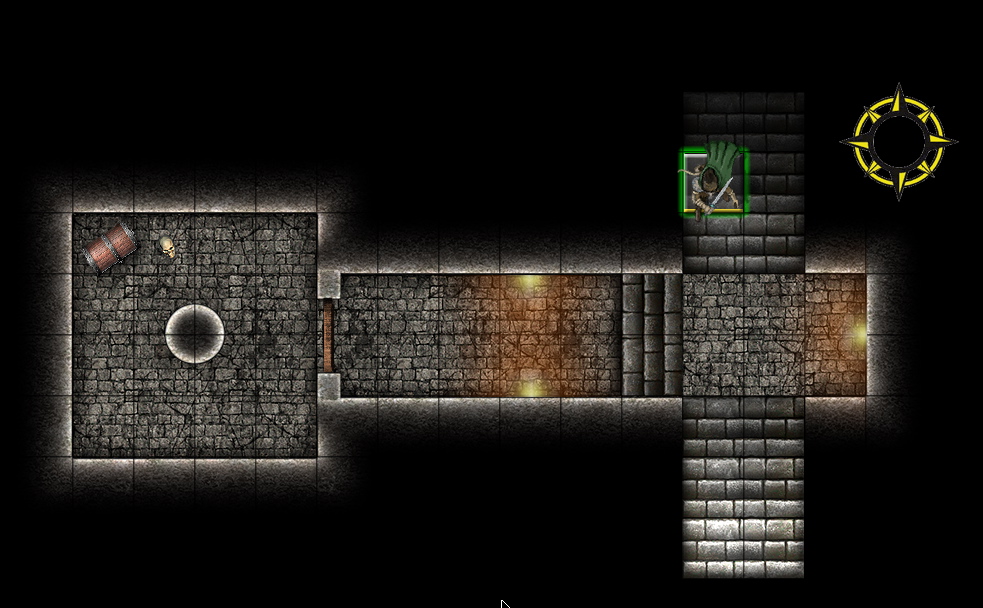
Here's another pic, with the secret door and secret room revealed. Now the GM and players are seeing the exact same thing.
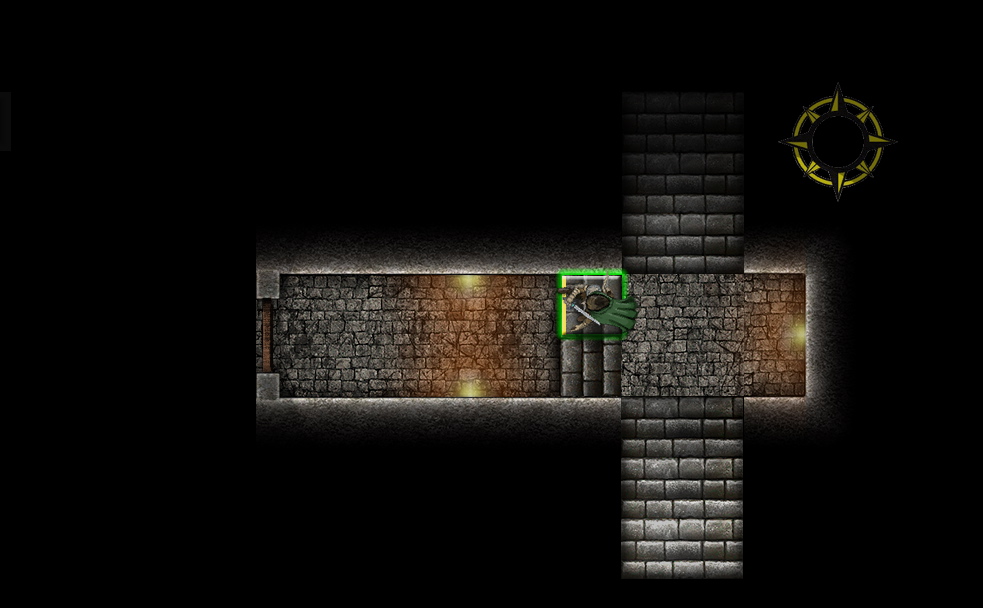
And here's the same setup, but I switched the "map" to a black background, which I think looks better (creepier). I rotated the door to a closed position, but I forgot to hide the room beyond when I took the screen capture. Still, it shows how the players would see the map while the secret stuff is hidden from them. Nothing there to give away the presence of a hidden room or door.
So in summary, I think your dungeon tiles work great! I can't wait until you finish converting the rest of the pieces you made at 40dpi.
BTW, before making the sample dungeon layout above, I resized all the tiles in Photoshop so that there's no need to fidget with the scaling tools in BRPG.
I used a stone texture as the base "map", then placed your dungeon pieces and told BRPG to treat them as tiles, so that they draw under the grid overlay and are unselectable/unmoveable by clicking on the map window.
Note the semi-transparent secret door symbol and secret room. These would not show up at all in the player's view, since they're set to Hidden.
Here's another pic, with the secret door and secret room revealed. Now the GM and players are seeing the exact same thing.
And here's the same setup, but I switched the "map" to a black background, which I think looks better (creepier). I rotated the door to a closed position, but I forgot to hide the room beyond when I took the screen capture. Still, it shows how the players would see the map while the secret stuff is hidden from them. Nothing there to give away the presence of a hidden room or door.
So in summary, I think your dungeon tiles work great! I can't wait until you finish converting the rest of the pieces you made at 40dpi.
BTW, before making the sample dungeon layout above, I resized all the tiles in Photoshop so that there's no need to fidget with the scaling tools in BRPG.
trevor wrote:Careful Heruca, you are bordering on a feature war.
Dorpond picks up his great axe, looks at his twisted reflection in the sharpened blade and slicks back his eyebrows..
LOL
All kidding aside, I really love the way the tiles look and I will probably use them myself. I tlooks to me it makes mapping easy, at least for dungeon crawls..